Manipulate SEGY files with segy2segy
Working with seismic data is great but sometimes technical issues such as loading and converting files come in the way of the more interesting part of the job.
One of the most common problems I have encountered in my career is the mismatch between the coordinate system of seismic data and the coordinate system of the rest of my project. In order to visualise all the available data (seismic profiles, gravity and magnetic grids) in a single platform such as OpendTect, they all have to share the same spatial reference. And more often than not, this is not the case. It could be because:
- the (geodetic) datums are different: typically the potential field data is delivered in WGS84 while the seismic data makes use of a local coordinate system based on a specific datum like ED50 or NAD 1927.
- the projection methods are different: while the Universal Transverse Mercator (UTM) projection is widely used, you might want to have everything projected with a Lambert Conic Conformal method.
There are commercial tools available to perform projections and re-projections of seismic data, and various consulting businesses can provide this service for a fee. Now this can be done for free using the Python tool I have written, segy2segy. This tool is intended to provide in the future more than just projections, but for now, that is what it essentially does.
Installation
The segy2segy script works with Python 2.7 (and should work with Python 3.x) and requires a couple of additional libraries (and of course numpy):
- The ability to read and write SEG-Y files is provided by Obspy.
- The transformations of coordinates and the projection calculations are handled by GDAL.
I use Anaconda for all my pythonic needs and I found the installation of dependencies straightforward, even for GDAL, which is notoriously difficult to get it to work properly. Please refer to my github page for more detailed instructions about how to install GDAL.
Using segy2segy
The tool can be either used on the command line or as a function within a Python script.
The tool can process a single file or all the files in a given folder. The input file cannot be overwritten so you either have to provide the name of the output file or a string that will be added as a suffix at the end of the input file name.
The syntax of the command line tool is inspired from GDAL programs such as gdalwarp. This is the reason why some of the parameters (-s_srs and -t_srs) are similar.
A typical example for processing a single file would be:
python segy2segy.py <\path\to\infile.segy> -o \path\to\output.segy -s_srs 23030 -t_srs 23029The numbers after the -s_srs (source or input coordinate system) and -t_srs (target or output coordinate system) options are EPSG codes. This is the most convenient way to enter references to coordinate systems. Each projection, datum, transformation has a unique standard code that GDAL will recognise and use for the calculation. For example, 23030 is ED50 / UTM zone 30N. There is a useful search engine to get the code you need for your project.
Processing all the files in a directory can be done with a single command:
python segy2segy.py <\path\to\folder> -s_srs 23030 -t_srs 23029 -s_coord CDP -t_coord Source -s _UTM29The -s option tells segy2segy to add “_UTM29” at the end of the input files to create the output. The other parameters of interest are -s_coord and -t_coord. They specify where the coordinates should be found and written in the SEGY files. There are three different locations:
- Source coordinate
- Group coordinate
- coordinate of ensemble (CDP) position
The default behaviour of segy2segy is to read the coordinates in the Source location (at byte numbers 73 and 77) and to write the new ones in the CDP location (at byte numbers 181 and 185). The example above does the contrary.
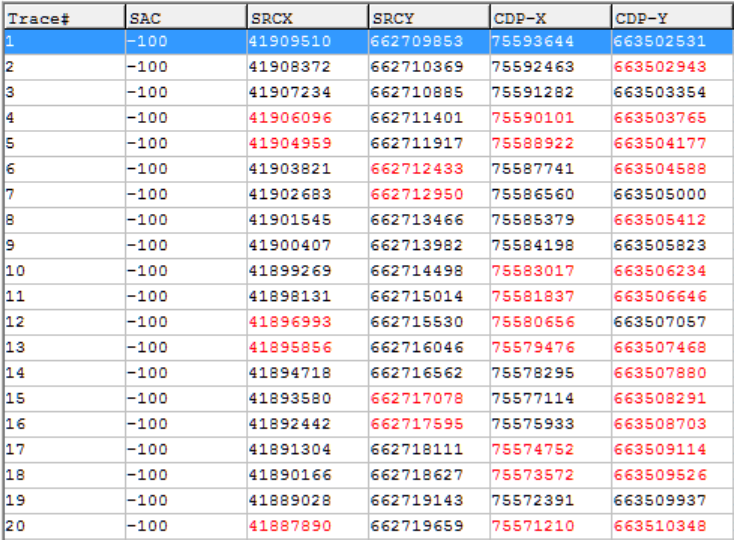
Once you have applied the tool successfully, you can check the result in a program such as Seisee, which is very convenient for browsing SEGY headers. Here is an example:
In this example, the coordinates in ED50 / UTM30 were read from SRCX and SRCY, converted to ED50 / UTM29 and then written in the CDP-X and CDP-Y columns.
Finally, the final option is related to the scaler header (SAC column in the Seisee screenshot), which allows you to work for example with centimetre precision even though the coordinates are stored as integers. By default, segy2segy will use and preserve the original scaler present in the input file (byte position 71). You can override that with the -fs (force scaling) and -sc (scaler) options. Keep in mind that if positive, the scaler is used as a multiplier, and when negative, it is used as a divisor.
I will extend the functionalities of segy2segy in the next few weeks, so stay tuned if you are interested! Please also comment and report issues on the github page.
